October 2019: I heard that long-time motorcyclist Terry Cross was selling a pile of 1960’s Triumph parts here in Mobile. I decided to go take a look with my friend Jim Arrington. The Triumph parts didn’t look that great consisting of 2 incomplete hard tail chopper frames and a dismantled 650 motor with a tight rod bearing. He said that he also had some motorcycles for sale. He took us to a small shed with a couple of 4 cylinder Honda Goldwings, an incomplete BSA chopper, a Kawasaki Z1 hulk and an AJS single all crammed together. The AJS caught my eye as it was pretty much complete. Jim Arrington was with me and he was able to get his hand on the kick starter. He could get the motor to turn but only barely. It was not stuck but far from free. I asked Terry if it was running when parked. He said he bought it out of state some time back and never got around to try to start it. He had never heard it run. The tank was decent inside, there were no tears in the seat, and all I could see that was missing was the tool box on the left side. A big 12 volt battery was lashed to a battery platform where the tool box used to be. When I asked Terry how much he said he paid $900 for it originally so I said “how about $1000?” he quickly agreed. Even with an engine rebuild it seemed rare enough to be worth a grand.
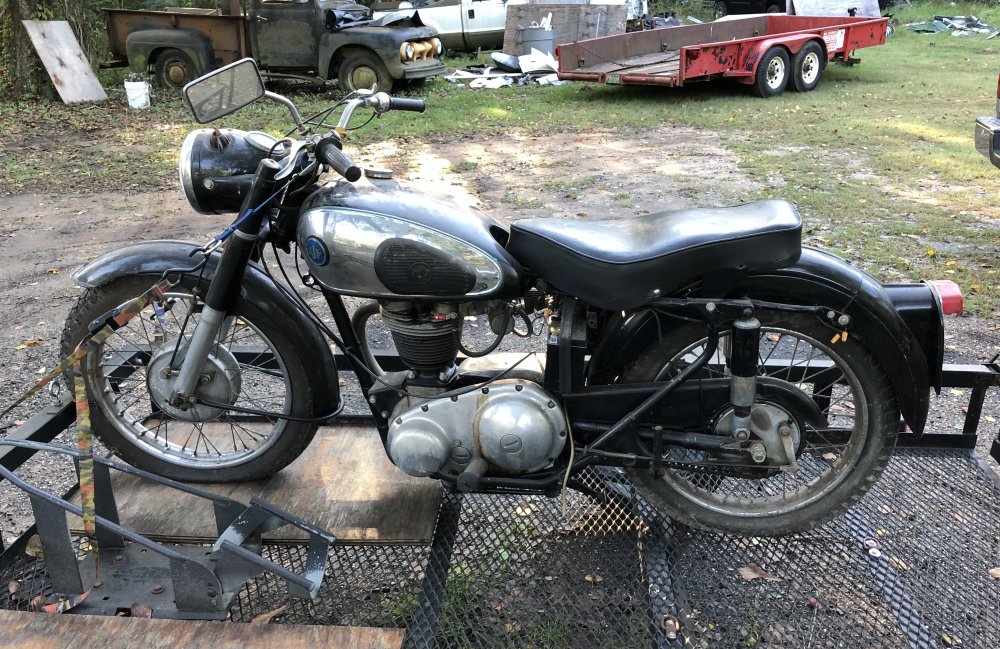
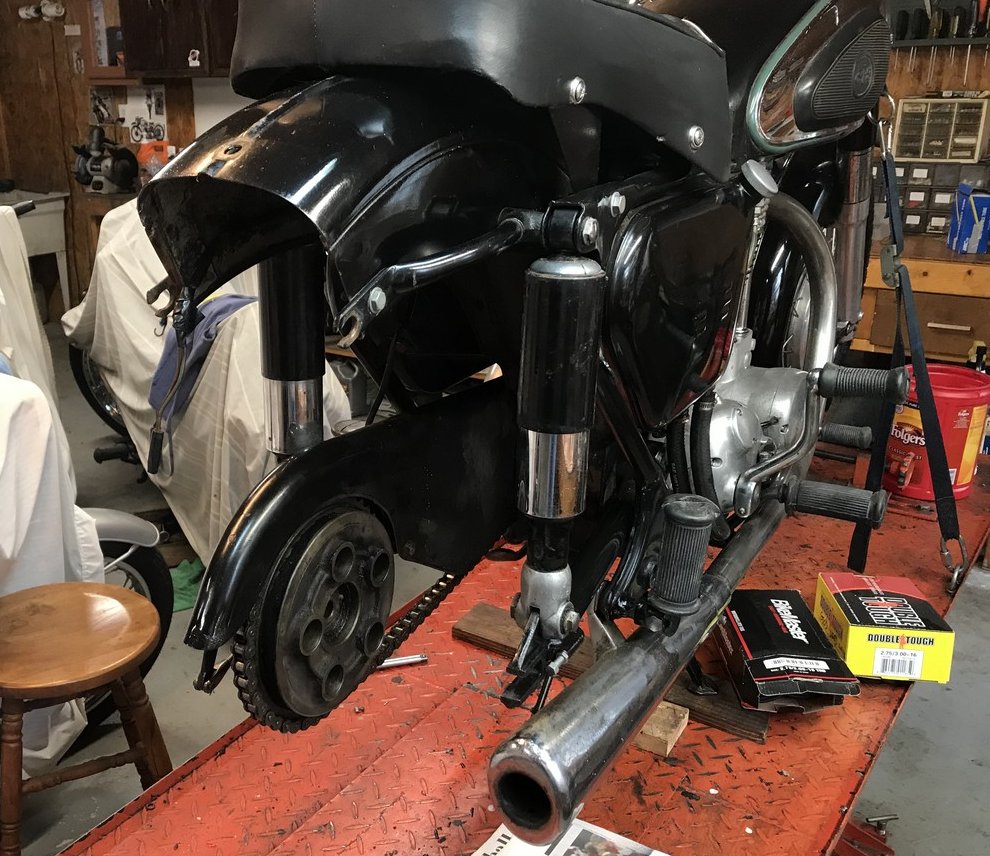
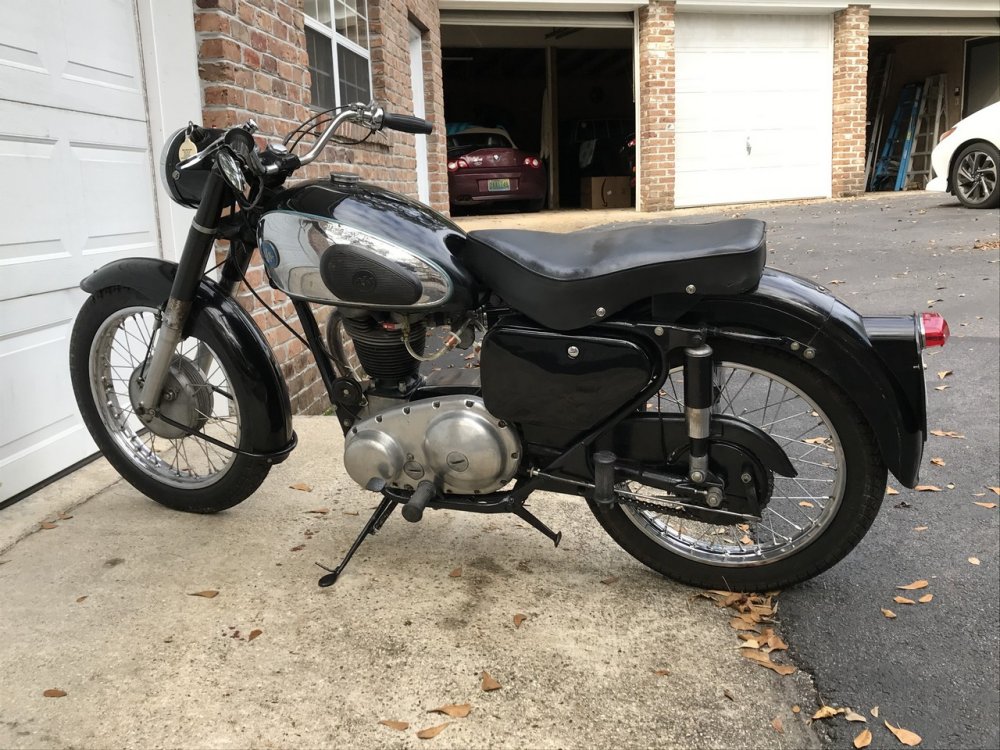
The next problem was to dig it out as it was wedged in between other bikes and there was no clear path to the door. Also, there was no guarantee that it would even roll. After we cleared a path it did not want to move. However we quickly discovered that it was in gear. Once in neutral the bike rolled out easily and, more importantly the engine kicked over freely. Below are pictures taken after loading it on my trailer. Although dirty there was surprising little rust.
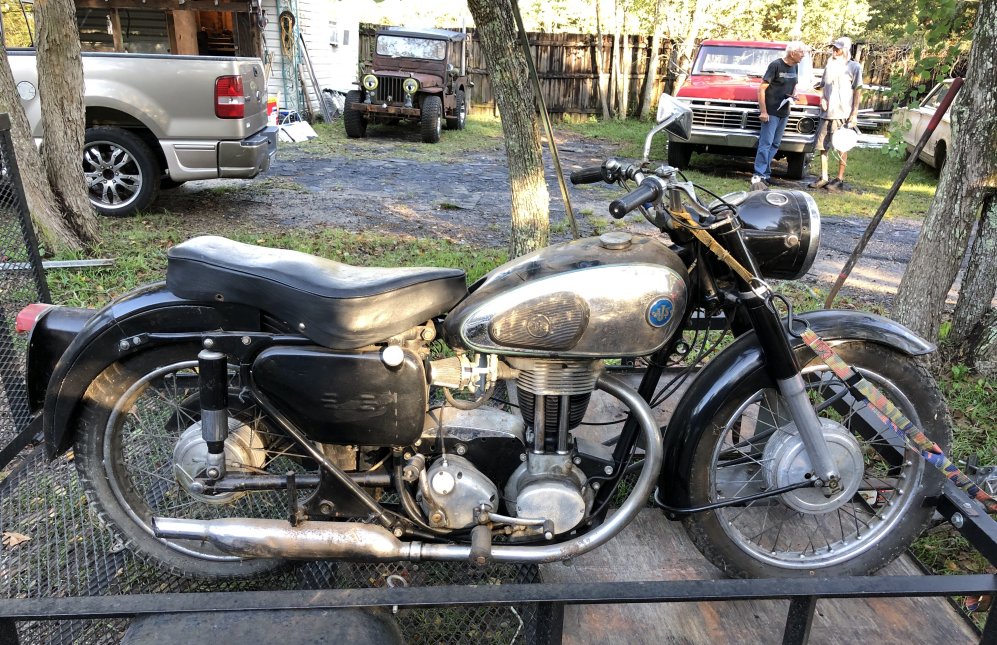
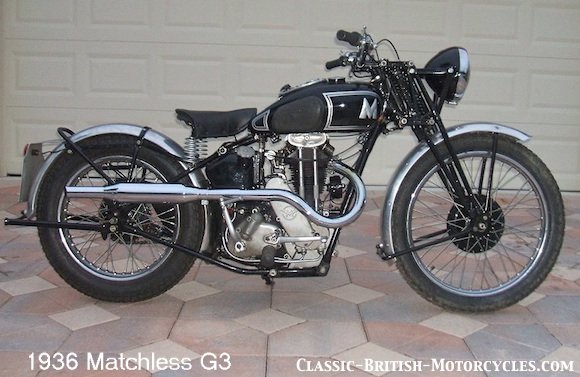
The bike was a 1958 350cc AJS 16MS. 16MS sounds like some Central American street gang but in actuality was a popular motorcycle model going back to pre WWII days. The AJS and Matchless brands were acquired by Associated Motor Cycles (AMC) in London in the 1930s. To please loyalist to the brands most AMC models were sold under both names. My bike was also the Matchless G3. The only difference was the ID stamped on the engine and the badges on the tank. The engine is a 350 cc overhead valve pushrod single making about 18 HP with a listed top speed of 80mph. It has the standard 4 speed AMC transmission that was used on most of AMC’s models. Apart from the funky hairpin valve springs it is a pretty conventional OHV pushrod motor. The 16MS is not a small bike. It has 19” rims fore and aft with large tires. I also have a 1961 Matchless G12 650c twin. Many of the parts are the same on both bikes including the front forks, wheels, transmission, oil and gas tanks and the lights. The 16MS/G3 had a long run with AMC. It was introduced in the 1930s and enjoyed only incremental improvements through the 1960s. Below is a picture of a 1936 G3. It is basically the same motor except for the diagonal chain case going up to the magneto. Also notice that the motor's hairpin valve springs are exposed. It has an old fashioned girder front fork and a rigid rear.
Back home I decided since the engine turned freely with compression I would see if it would run rather than tear the engine down for inspection. I took the monoblock carburetor off figuring it would be awful. Actually it was clean as a pin. I cleaned it anyway before putting it back on. Next, I figured the points would be nasty but again they were fine. The centrifugal advance was free and kicking the bike over with a hot battery made spark. I drained the oil tank and engine sump and filled it with fresh 20W50 oil. I looked into the transmission and it was full of clean oil. The tires held air and all of the cables worked fine including the compression release. I squirted some oil on the chain and it ran smoothly over the sprocket. I put a little gas in the tank and made up fuel lines for each petcock with a paper filter in each. Even the petcocks worked fine.
As I noted above, the bike had a large 12 volt battery lashed to it. I thought that had to be wrong and put a small 6v battery on it. The Bike fired right up and after fiddling with the settings on the carb it sounded good with no smoke. I checked the headlight and to my surprise there was a 12V bulb in it.. Earlier 16MS models had an intricate (and expensive) Lucas magneto and generator. However, by 1958 that was all scrapped for a much cheaper permanent magnet alternator on the end of the crankshaft with a diode under the seat to make DC current for the battery and coil ignition. The earlier models used a 6 V stator and in the mid 60's British motorcycle makers switched to a 12 V stator to get brighter lights and use lighter wiring. Both stators were the same size and conversion just required replacing the stator. The 12 volt systems also required addition of a zenor diode to prevent over charging the battery. Many of these 6 V machines were converted to 12 volts and apparently mine was such a convert. When I hooked up the 12 V battery the lights worked and the ammeter showed that the battery was charging. It was time for a ride.
I started it on the center stand. When I put it in first gear in could see that the rear wheel was spinning. I pulled in the clutch and stepped on the brake pedal. That killed the motor. The clutch was stuck which is not surprising after many years sitting in a damp shed with the clutch engaged. Some people try to unstick a clutch by push starting the bike and accelerating hard up and down the street. More often than not that buggers the transmission from clutchless shifts rather than freeing up the clutch. The best way to free a clutch is to start the motor on the center stand and then gently shift up to the top gear. Give it the gas and when the motor is revving in the power band apply the rear brake. That high gear applies the maximum torque on the clutch for a minimum torque on the brake. If that doesn’t break it loose then nothing will and the clutch will have to be dismantled to pry the plates apart. As expected the clutch broke loose easily and I had a great ride. The bike was smooth, the metric speedometer worked fine as did the Lucas Ammeter. If Terry would have just charged the battery that he had lashed to the bike and put some gas in the tank it would have started right up for him. The bike did not smoke but it did leak oil pretty bad. That was traced to cracks in both of the 3/8 " rubber oil lines between the motor and the oil tank which were easily replaced.
The old girl cleaned up quite nicely. A little touch up paint here and some rubbing compound there and the black finish which I assume was original didn’t look too bad. Much of the chrome and aluminum cleaned up as well with some Blue Magic metal polish. Should I leave it as is or should I restore it? I decide to try the former first. It did need some TLC. The clutch and brake levers were badly rusted as was the horn/light switch. So were the seal holders on the front forks as was the rear rim and spokes. I ordered replacements for those figuring that their replacement fell in the category of "routine upkeep". The wheels are bizarre on AMC bikes. The rims are both 19” and the full-width hubs look the same. But a closer look shows the spoke lacing pattern on the back is a mirror image of that on the front. Both hubs use nail type spokes (each spoke has a flat head on it like a nail) and the spoke pattern is dictated by how the spoke holes in the hub are drilled. The hub's spoke pattern must match that drilled into the rim. Why they didn’t make both wheels the same seems crazy. The rear wheel has the standard pattern used on most British bikes and thank goodness that is the one that I need to replace. I found a new rim for a Royal Enfield Bullet on eBay in India for $50 with shipping. It looked beautiful and fit perfectly. Replacement AMC rims are still available but at 3 times the price. I bought the spokes and rubber parts from Mike at Walridge Motors in Canada. He is an AMC expert and can get you any part you need.
Below are pictures of the rear wheel rebuild. Removing the quick release rear wheel is a pleasure. The back of the rear fender can be extracted after removing the three bolts that hold it on and unplugging the tail light wires. After removing the axel along with its spacer you wiggle the wheel while pulling it toward the right side of the bike and it comes free of the sprocket/brake drum. Then you just roll it out the back. It is much easier than removing a wheel on a period Triumph. The chain and brake rod and backing plate are left in situ on the AJS. Getting the rear wheel out from under the Triumph's fender while on the center stand is also tricky but it is no problem on the AJS thanks to the removable tailpiece..
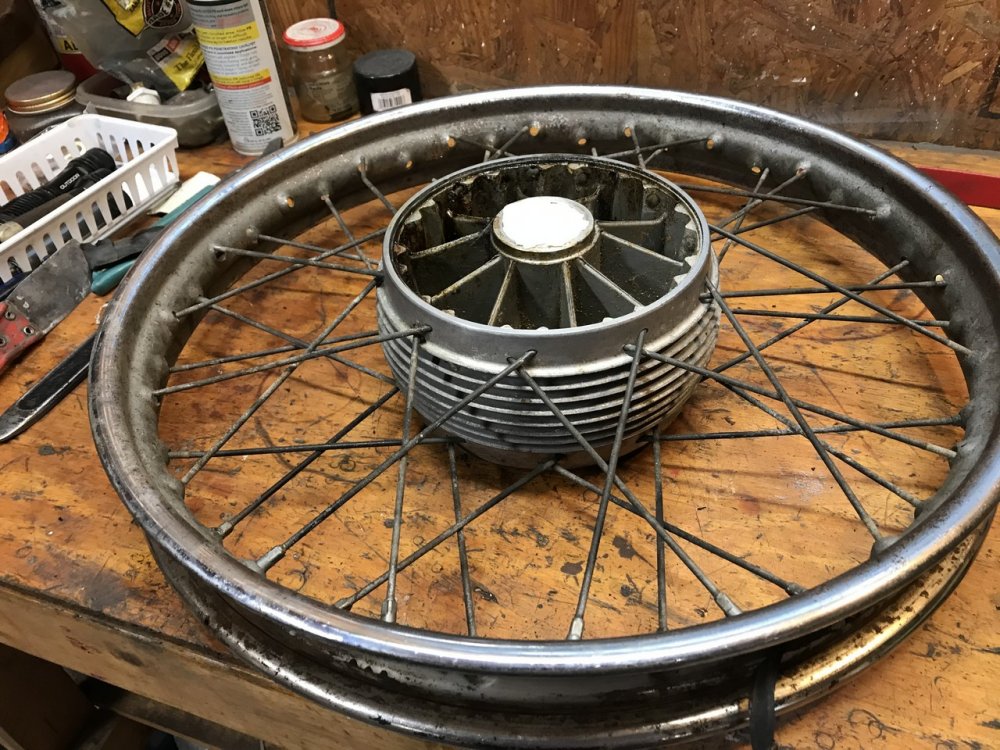
Below you can see the old rim and spokes. Very little chrome is left on the rim. Notice that I have
already removed most of the nipples from the spokes using a spoke wrench and an
electric screwdriver. I have paper towel stuffed in the tapered wheel bearings to keep them clean.
Note how the nail-shaped spokes push through the drilled holes in the hub and
point toward the holes in the rim. With the nipples removed the spokes can be
slid out of the hub. To learn more about wheel lacing, see my article on this
web site.
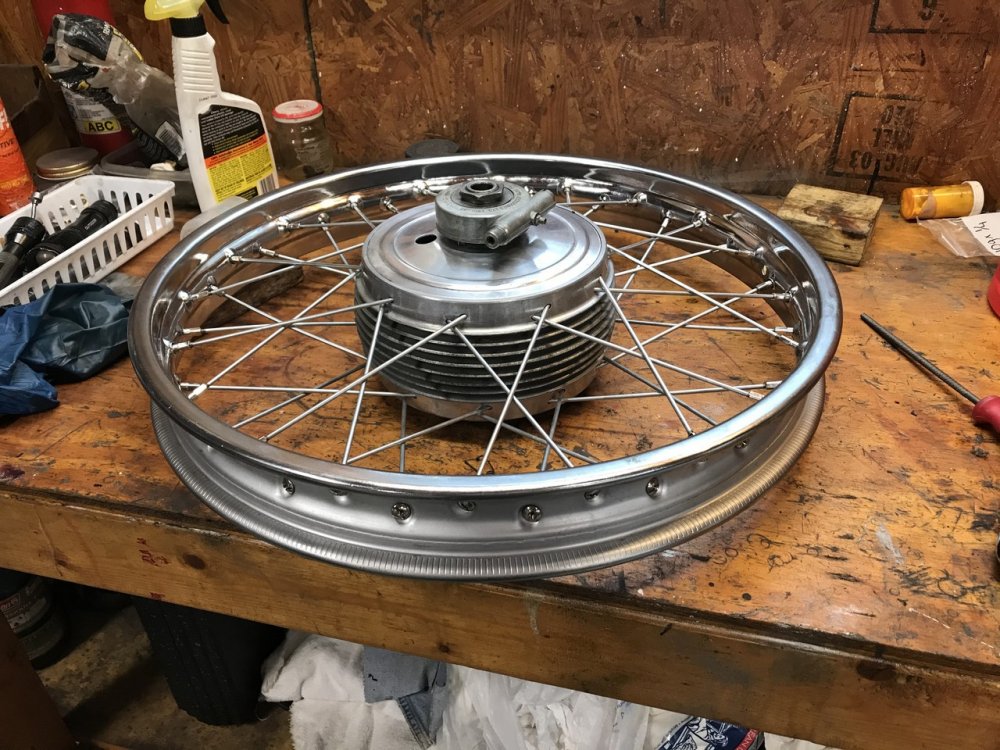
After removing all spokes I cleaned up the hub with metal polish and 000 steel wool. Then I
re-laced the new rim
using the new spokes. A hub like this is the easiest to lace. You just put the spokes into the hub and
then place the rim around the hub and turn the rim until all of the spoke
line up with the holes in the rim. Push the nipple through the hole in the rim
and screw it onto the waiting spoke. That’s it.
After truing the rim on my truing stand I put a new tire on it. To learn more on
how to lace a wheel read my
how-to article on this web site.
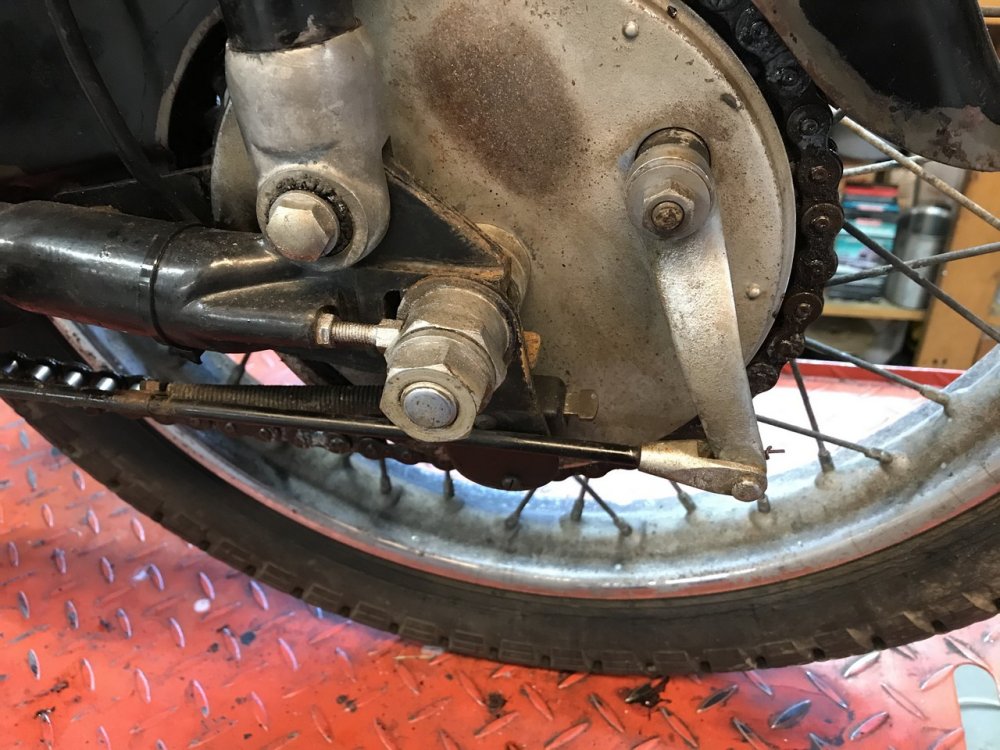
While the wheel was off I removed the rear brake drum. AMC bikes in that era had a chromed
cover riveted onto the brake drum. Mine was really rusty so I bead blasted it and painted it gloss black.
All rusty nuts and bolts were bead blasted and given a shot of clear lacquer. Below is a picture of the rusty brake
drum and rim. Notice the Lucas brake switch mounted on the rear axel.
Here is the after picture. Notice the axel nuts that were bead-blasted and
coated with clear lacquer.
The next issue was the rusty seal holders on the front fork. I had to knock out the front fork
tubes to replace them and that required a special tool. You can buy the
tool from Walridge but if you have a spare AMC Fork Cap you can make your
own. I just happened to have a fork cap from my G12. First, I bought a foot-long ½"
carriage bolt from the hardware store. I took the O ring out of the cap and
removed the adaptor that connects the damper rod. I then hacksawed the top off
of the cap sawing in the in the O ring groove.
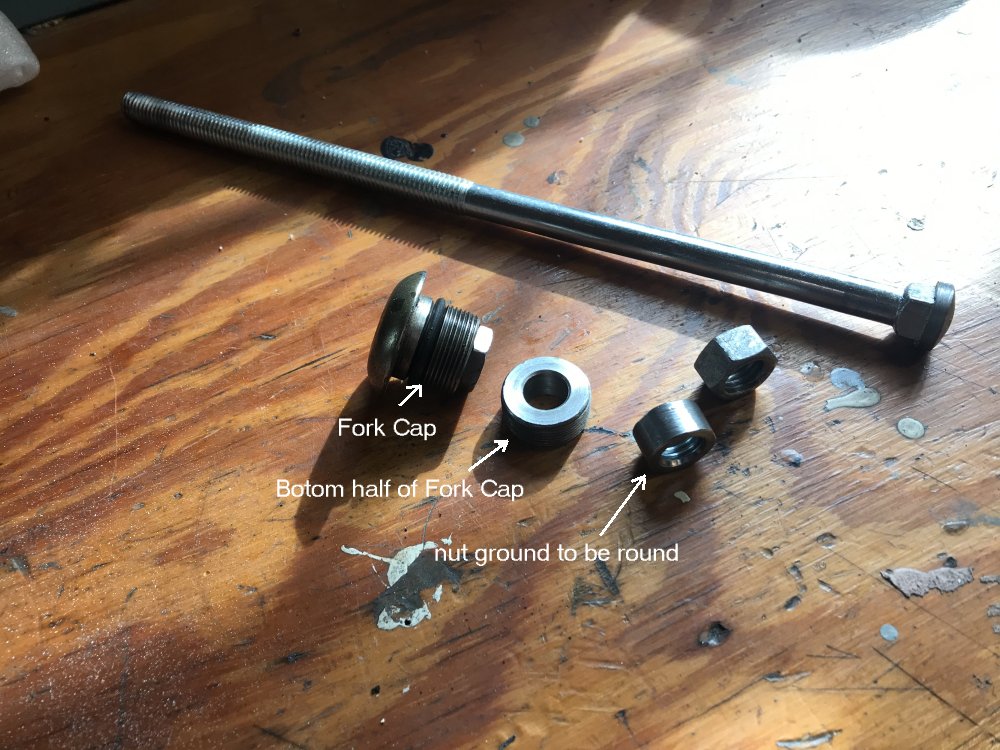
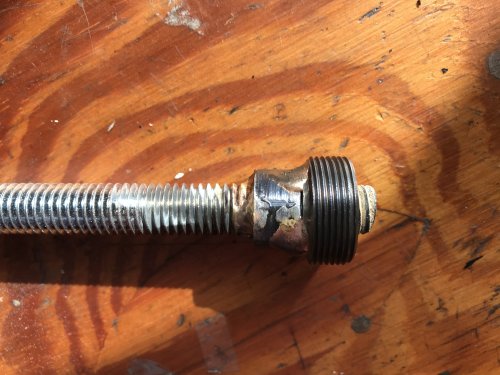
I mounted the threaded half in my lathe and drilled the center with a 27/64th drill bit and then tapped it to a ½ " coarse thread. I also cleaned up my saw cut with the lathe just to make it look better. Next I took a 1/2” coarse nut and ground it so it was cylindrical and would fit through the holes in the triple tree. I Then screwed the nut and the threaded piece of the fork cap tight on the end of the carriage bolt and brazed them in place (see picture below). Brazing is important so that you can turn the shaft to unscrew the tool. Without it the lock nut will loosen as you pound on it making it difficult to get out (I learned that the hard way). Put the nut above the Threaded Fork Cap section as shown because that will take most the impact when you pound on it. Now I had a tool that I could use to drive the fork out of the triple tree and to later pull it back in.
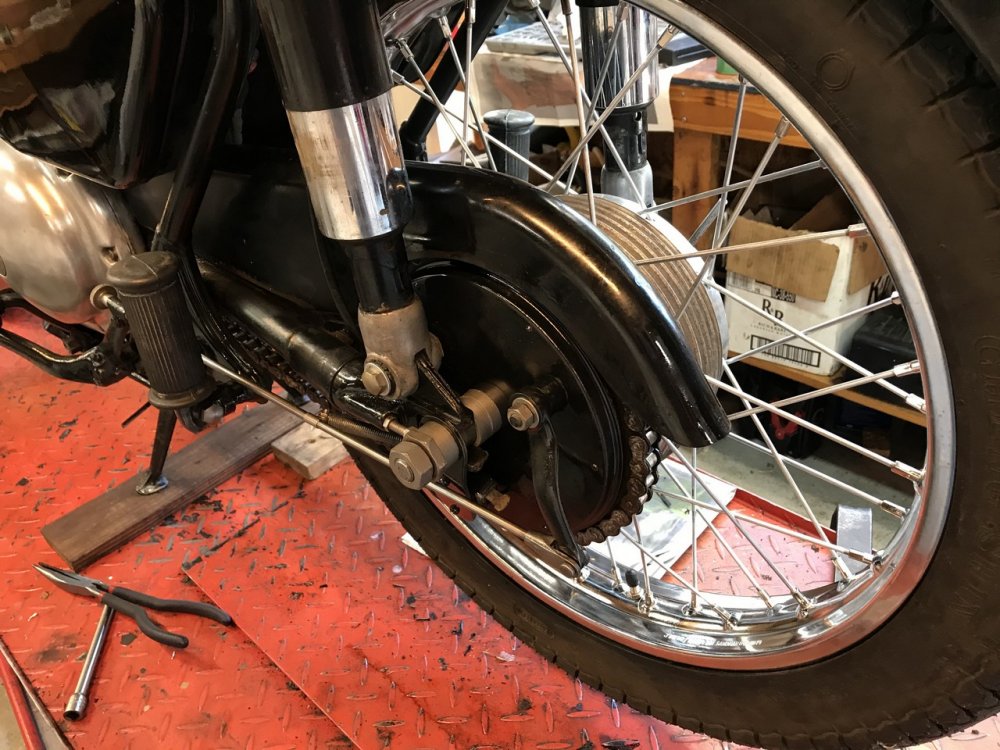
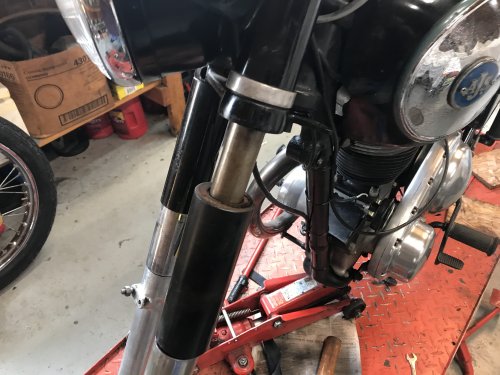
Here is how I dismantled the forks: I removed the front tire and fender. Next I took the Fork Cap off with an Allan wrench. I disconnected the damper rod and let it fall into the fork tube. I drained the oil by removing the drain screws at the bottom of each tube. I removed the pinch bolts on the bottom of the triple tree and drove a screwdriver into the slot to loosen the triple tree bracket's grip on the fork tube. I screwed the tool into the top of the fork tube at least 5 full turns (important so that you do not damage the threads in the fork tube as you pound). I took a large hammer and drove the tube down and out by beating on the top of the tool. Once the fork tube was out, I unscrewed the old fork seal holder, replaced the seal, and screwed the new holder on. While the seal holders were off I cleaned the fork tubes with 000 steel wool and oil. To put the forks back together I positioned the fork tube with its spring and cover in place back into the lower triple tree. I then screwed the tool back into the top of the tube and pulled the fork back up with the tool. I had to tap on the underside of the tool’s head with a hammer to help move it. I also used a strap from the bottom of the leg to the triple tree to compress the spring. When the fork was in position I tightened the pinch bolt to hold it and removed the tool. I used a magnetic retriever to pull the damper rod out of the tube and screwed it back into the Fork Cap. I added 70 ml of 30W oil to each leg after replacing the drain screws. I then screwed the Fork Cap into the fork tube, loosened the pinch bolt and tightened the cap which pulled the fork tube tight into the top of the triple tree. I then retightened the pinch bolt. The picture below shows the fork being driven out of the triple tree. Note that the bike is on its center stand with the front down tube supported by a jack.
The finished job appears below. The front rim was not too bad so I just put a new tire on
it. I found these nice seal holders made in India on eBay for $65 a pair.

Another issue was the missing tool box which also holds the battery. I planned to use a small 12V sealed lead-acid battery instead of the large original wet cell. I bought a replica battery cover which looks like the original battery complete with the Lucas logo. The small battery fit inside the cover with some foam packing to keep it in place. I had been watching eBay for the tool box. Earlier models had a kidney-shaped tool box on both sides that fit in the rear loop of the frame. The battery sat in front of the tool box and was fully exposed. There were plenty of those kidney boxes listed on eBay.

My model, however, had a tool box that was shaped to match the large oil tank on the right side and contained the battery out of sight. I could not find one of those anywhere. After a couple of months of watching eBay I had decided to settle for a kidney box when the correct one finally came up. They were asking $150 to "buy it now" and I immediately bought it. It was complete and fit perfectly with one small problem. The cover had been chrome plated and had a dent in it. The chrome looked way out of place and the dent was obvious. I decided to fix the dent and paint it black.

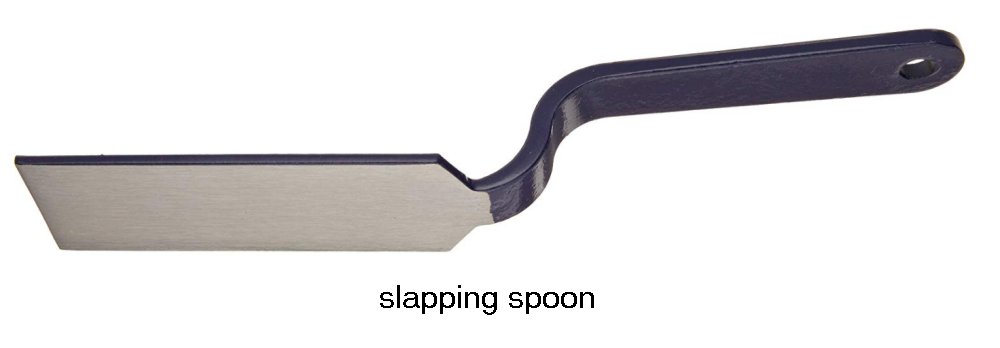
I tried filling the dent with Bondo but I could not get it to stick to the chrome, even after roughing the chrome up with sandpaper the bondo just peeled off so I decided to use my slapping spoon to take the dent out. I bought my spoon and a small leather sand bag as a kit from Harbor Freight several years ago. I am not sure whether they still have them but I know Amazon does. I held the sand bag behind the dent while I slapped the front with the spoon around the dent. Amazingly the dent slowly disappeared. The spoon left small scratches in the chrome which were filled with several coats of primer that I lightly sanded between coats. I then painted it black with base coat/clear coat enamel. The dent was not detectable. The Lucas Battery cover fit perfectly in the tool box's battery cavity and protrudes slightly behind the box by design. I also found a new chrome thumb screw to replace the philips
Here is the bike with the new tool box after painting the cover black.
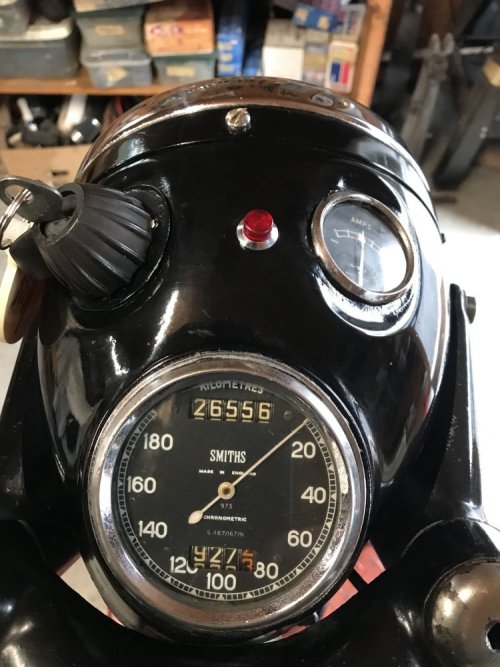
Here is a picture of the headlight with its metric speedometer and ammeter. The bike had 16,200 miles on it. The ignition switch is correct but the decorative bezel under it is missing. I added the red high beam indicator to fill the hole someone drilled off center in the headlight shell. Since this picture was taken I replaced the red high beam indicator with the correct Lucas green jewel lamp.
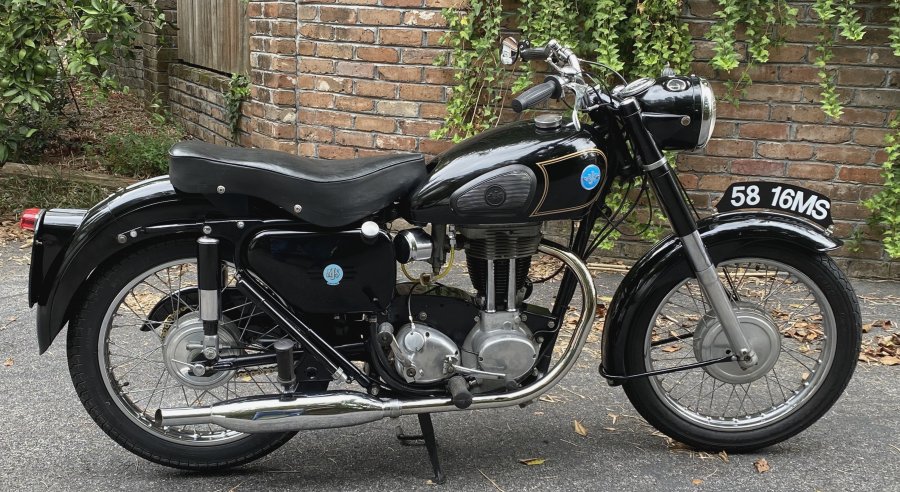
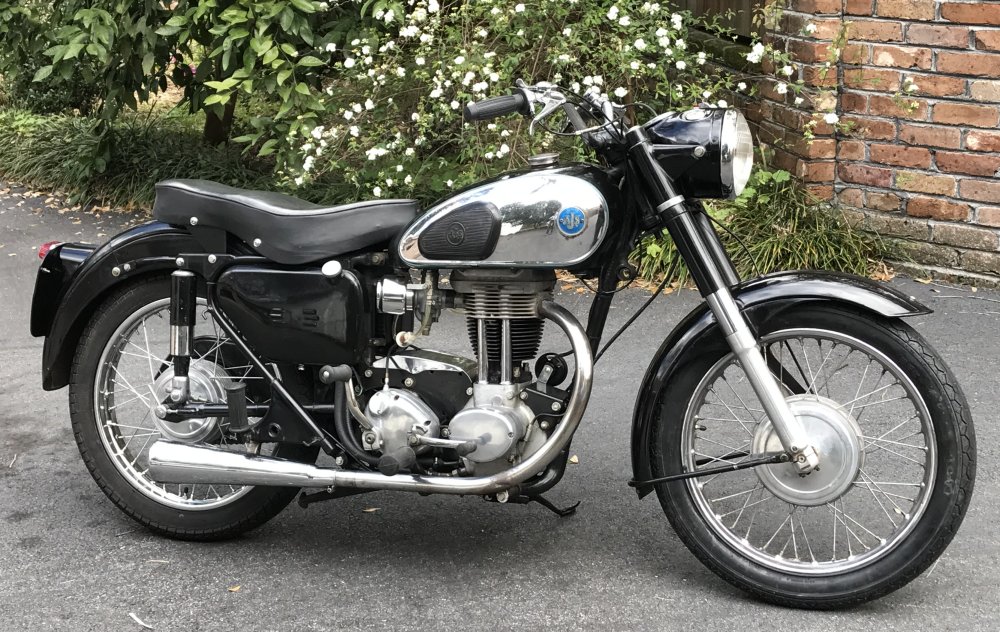
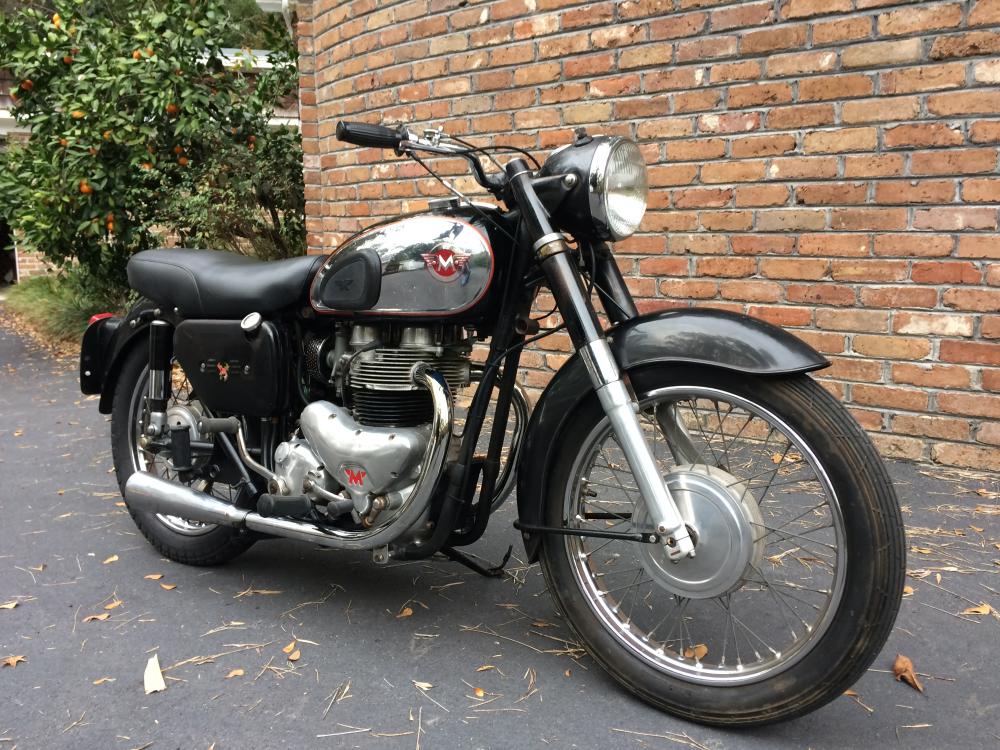
Here is a picture of the bike as of the time of this writing. The muffler is a spare from my G12. Not exactly correct but it is AMC and it bolted right on. The original silencer was rusty and dented. The original air filter mounted on the frame behind to oil tank and connected to the carburetor with a rubber tube. Unfortunately it was missing and had been replaced with an ugly pot type filter (see "as bought" pictures above). I found this chrome air cleaner on eBay which fit perfectly and looks good even though it is not correct. The horn was also missing. This black horn from Advance Auto looks very similar to the original and bolted right on. The chrome panels on the tank are bolt-on and replicas are available as are the AJS badges. The originals are in fair condition and will remain on the bike for now.
Below is a picture of my matchless G12 which is pretty much as I bought it. It is my 16MS's big brother. Note the similarities between the two.
The paint on the 16MS was not original and in bad shape with many scratches and dents. While the bike was stripped down I removed the transmission and replaced the countershaft bearings which were noisy. I also pulled the head and replaced the leaky pushrod tube seals. I sent the sheet metal parts to get sand blasted down to bare metal and primed. I then painted everything with black base coat/clear coat automotive enamel. I did not want to strip it down to a bare frame so I touched up the frame in situ with 400 grit sand paper and Dupli-Color universal black spray paint. I then put everything back together.
The chrome side panels on the tank were in poor shape. New side panels are available but quite expensive. The side panels are held on by the knee pads and the plastic A.J.S. badge. Underneath them was the same tank that was used on the 1957 model. I decided that I would leave the panels off and see how it looked without them. A.J.S. tanks traditionally had a pinstripe frame around the badges so I tried to duplicate the 1957 pattern but with self adhesive double stripe gold pinstripe tape. I found that I could make smooth bends if I stretched the tape as I applied it. The pin stripes would be hidden under the panels if I ever decided to buy new ones. Finally, I replaced the rusty exhaust system. Below is a picture of the final result.